
How to Measure Mobility Progress: A Repeatable ROM Tracking System
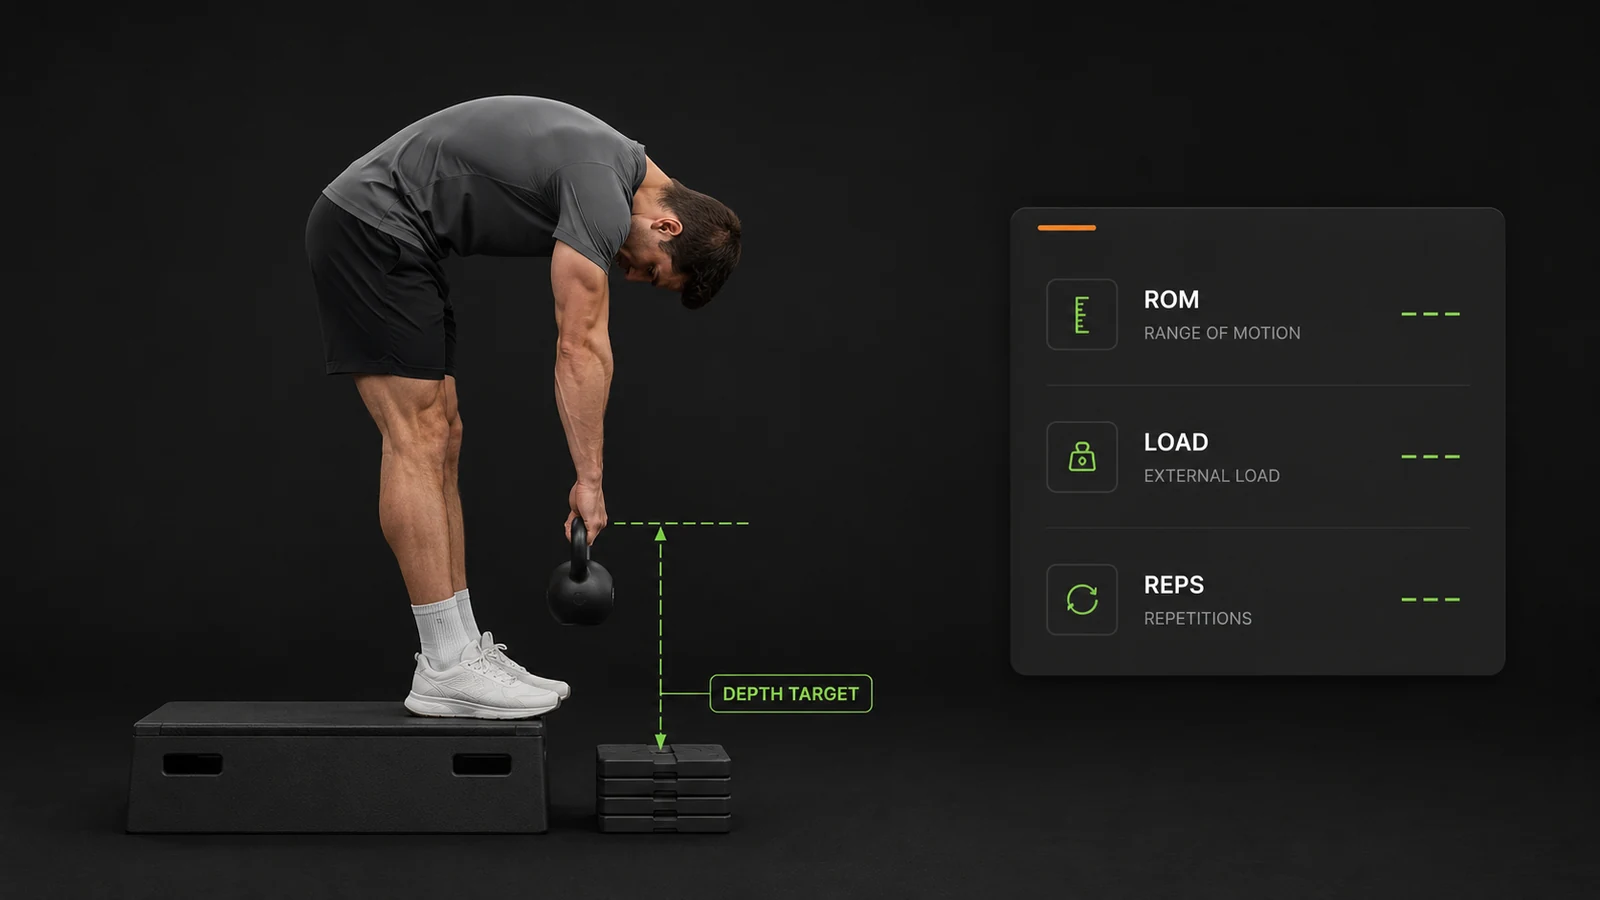
Imagine going to the gym without knowing how much weight you lifted. You do not count repetitions or sets. You have no record of the work. Every three months, you take a photo of your squat and hope it looks better.
That is how many people approach mobility training. They stretch for a while, judge the session by how intense it felt, and occasionally compare two photographs. The photos may show a visible change, but they cannot tell you what happened between them. You do not know which exercises improved, which training dose you tolerated, or whether one unusually good or bad day distorted the comparison.
You can measure mobility training with the same seriousness as strength training. Choose a specific movement, define a stable target, and record your range of motion alongside the sets, repetitions, load, or time you perform. Use normal working sets as your measurement stream. You do not need to force a maximal range-of-motion test every time you train.
The result is a record you can review week by week. It shows the range you can reproduce, the deepest range you reached during the planned work, and whether the overall trend is moving in the right direction.
Decide what “mobility progress” means for the movement
Before choosing a ruler, yoga block, or app, define the quality you want to improve. A single number cannot represent your total mobility.
Range of motion (ROM) describes how far you move through a defined action under defined conditions. You might measure an angle in degrees, the distance between your hand and the floor, the height of a block under your pelvis, or the width of your grip on a dowel.
Flexibility usually refers to your capacity to reach a range. Researchers measure it in several ways, including static end range, passive measures, and active measures. The method affects the result, which is why “my flexibility improved” needs a test attached to it.[1]
In this article, mobility works as a practical umbrella term. It can include available range and how you control or use it in a task. A deeper forward fold can show progress in that forward-fold test. It does not tell you everything about your hips, spine, or ability to control range in another task.
Label the assistance and the load separately
Two exercises can look similar while measuring different capacities. Record two separate properties:
- Assistance: active/self-generated or externally assisted/passive.
- Load state: unloaded or loaded, including the defined external load.
Keep both properties stable in your records. A passive straight-leg raise and an active straight-leg raise do not produce interchangeable scores. A loaded Jefferson curl at 20 kilograms also asks a different question from an unloaded forward fold, even though both movements are active.
One study of healthy adults found passive elbow ROM values 3° to 5° larger than active values under its protocol.[2] That number does not transfer to other joints, but the principle does: changing the test changes the meaning of the score.
Build a mobility measurement you can repeat
A tape measure creates a number. The protocol makes the number useful.
For every mobility exercise you intend to track, write a simple measurement card with seven fields:
| Field | What to define | Example |
|---|---|---|
| Movement | Exact exercise and variation | Jefferson curl from a 10 cm platform |
| Reference points | The two points whose relationship you measure | Fingertips to top of target stack |
| Unit and direction | Centimetres, degrees, or grip width; whether higher or lower means deeper range | Smaller gap means more range |
| Movement standard | Technique rules that keep the repetition comparable | Same foot position, straight knees, controlled tempo |
| Assistance and load | Active or passive; unloaded or loaded | Active and loaded |
| Test condition | Warm-up, trial rule, and timing | After the same warm-up, measured on work sets |
| Companion variables | Training dose and useful context | Load, sets, reps, tempo, RPE |
This card prevents a common error: collecting precise-looking numbers from a test that changes every week. If your stance widens, your knees bend more, your grip changes, or you test after a different warm-up, you have changed the task.
Use an adjustable external target
My preferred coaching method uses a stable external reference and measures the distance between the body and that reference. Depending on the movement, the target may sit beneath the hands, under the pelvis, in front of the torso, or between the hands. Books, thin plates, yoga blocks, a wall mark, or grip spacing can all work.
The target turns an abstract instruction such as “stretch a little deeper” into a specific task. You know what you intend to reach during the set. You can also change the target in small increments when the current level becomes repeatable.
Define the sign convention before you start:
- Gap to target: 8 cm, 6 cm, 4 cm. Lower values mean more range.
- Distance beyond target: 0 cm, 1 cm, 2 cm. Higher values mean more range.
- Hand spacing: 100 cm, 95 cm, 90 cm. Lower values may mean more shoulder range if technique remains unchanged.
Choose one convention and do not change it during the training block. Improvement may appear as a positive number, a negative number, a higher value, or a lower value.
Keep the test conditions stable
Warm-up and repeated attempts can change the value you record within the same session. In a small study of healthy sport students, most of the tested ROM measures increased over repeated trials. The researchers warned that different repetition counts and previous warm-ups can produce different results.[3]
Choose your rule in advance. For example:
- Complete the same short warm-up.
- Perform one familiarization set.
- Record one preselected scoring unit across three working sets.
- Do not add attempts merely to beat the best value.
Choose that scoring unit before the block: every repetition, the deepest controlled repetition of each set, or one standardized end position per set. Do not switch between them midway through the series.
Use the same measuring tool and, when possible, the same person. If the tool, measurer, position, or landmark method changes, mark a break in the series rather than treating both sides as directly comparable.
Testing time can also affect some flexibility scores. Research on hamstring and lumbar field tests found time-of-day differences, although the effect varies with the test and does not justify a universal “evening is better” rule.[4] You do not need to schedule every session at the same minute. Record obvious differences and compare sessions that are similar enough to support a useful conclusion.
Do not turn every session into a maximal ROM test
Measurement can create a new problem when the trainee starts chasing the number.
Strength athletes do not attempt a one-repetition maximum every time they squat. Their ordinary sets already provide information: load, repetitions, effort, bar speed, and technical consistency. Mobility training can work the same way.
In my coaching, quantifiable exercises performed with a stable setup make each working set a useful observation. You can calculate average ROM across the selected scoring units, record the deepest or shallowest value according to your convention, and count how often you reached the planned target. You do not need to force a separate maximal attempt at the end.
This distinction matters most in loaded or demanding positions. Pushing farther solely to improve the log changes the planned training dose. It may add fatigue, reduce control, or encourage you to force a range you cannot reproduce. Use the measurement to describe the programmed work; do not change the work merely to improve the number.
For safety, stop treating a set as valid data when reaching the target requires sharp or escalating pain, loss of control, or a technique change that breaks the measurement standard. Record what happened and end or adjust the set. A deeper number does not justify an unplanned maximal effort.
Use occasional dedicated assessments only when they answer a question the working sets cannot answer. Keep those assessments standardized and separated clearly from normal training data.
Four ways to measure mobility during normal training
The following setups come from my coaching practice. They are practical tracking examples, not validated clinical assessments or normative targets. Each setup needs its own reference points and technique standard.
Jefferson curl or standing forward fold
Stand on the same surface with the same foot position. Place a stack of thin books, plates, or blocks beneath your hands. Define whether the repetition counts when your fingertips, palms, or implement touch the target.
For an unloaded forward fold, record the hand-to-target distance under the same knee and spinal-position rules. For a Jefferson curl, record the range beside the load, repetitions, tempo, and platform height. The loaded stretching guide covers the programming method in more detail; this article focuses on measuring the result.
Watch my Jefferson curl tutorial: This video comes from the private ENSO MOVERS mobility library. I demonstrate how I perform the movement, use an adjustable target to measure the range, and approach loading progressively. The video is in Spanish; turn on YouTube’s automatic captions and translation if useful.
In adults with chronic low back pain, a defined fingertip-to-floor protocol showed high reliability, but it reflects the complete forward-bending task. Do not treat it as an isolated measure of hamstring length.[5] If your knees, pelvis, spine, or foot position change, your measurement may improve even though you have not improved the quality you intended to train.
Example measurement card
- Movement: Jefferson curl from the same platform
- Target: fingertips to top of plate stack
- Unit: centimetres from target; lower is deeper
- Standard: same stance, knee position, load, and three-second lowering phase
- Recorded work: three sets of eight repetitions
- Review: average ROM, lowest distance reached, and target success count
Side split or horse stance
Place a stack of blocks or another stable target beneath the pelvis. Measure the distance from the chosen pelvic reference point to the floor or record the height of the stack you can reach under your normal training standard.
Keep the stance width, foot orientation, pelvic position, hand support, and warm-up comparable. A lower stack does not represent the same movement if you also rotate the feet, narrow the stance, or transfer more weight into the hands.
Pair the ROM value with the exercise dose. A 20 cm pelvis-to-floor distance held for 30 seconds under control differs from briefly touching the same depth before leaving the position. If splits are the goal, the front- and side-split progression guide applies this measurement to a dedicated training plan.
Loaded pancake
A pancake needs at least two defined measurements:
- the distance or angle between the legs;
- the distance between the torso and a fixed target.
Keep them separate. If you widen the legs and lower the torso at the same time, you cannot tell which change produced the new score.
Place a yoga block or low target in front of the torso. Choose one anatomical reference point, such as the sternum, and use it every time. Record load placement, hold time or repetitions, and the support you use with the hands.
Shoulder dislocate
Use the same dowel or strap and measure the distance between your hands. Define the elbow rule, grip, movement path, and compensation boundary. If the elbows bend or the ribcage position changes, a narrower grip may reflect a different technique rather than more shoulder range.
Hand spacing becomes the primary ROM metric. Repetitions, tempo, and effort describe the work. Improvement may appear as a narrower grip at the same standard, more controlled repetitions at the same grip, or the same grip with less effort.
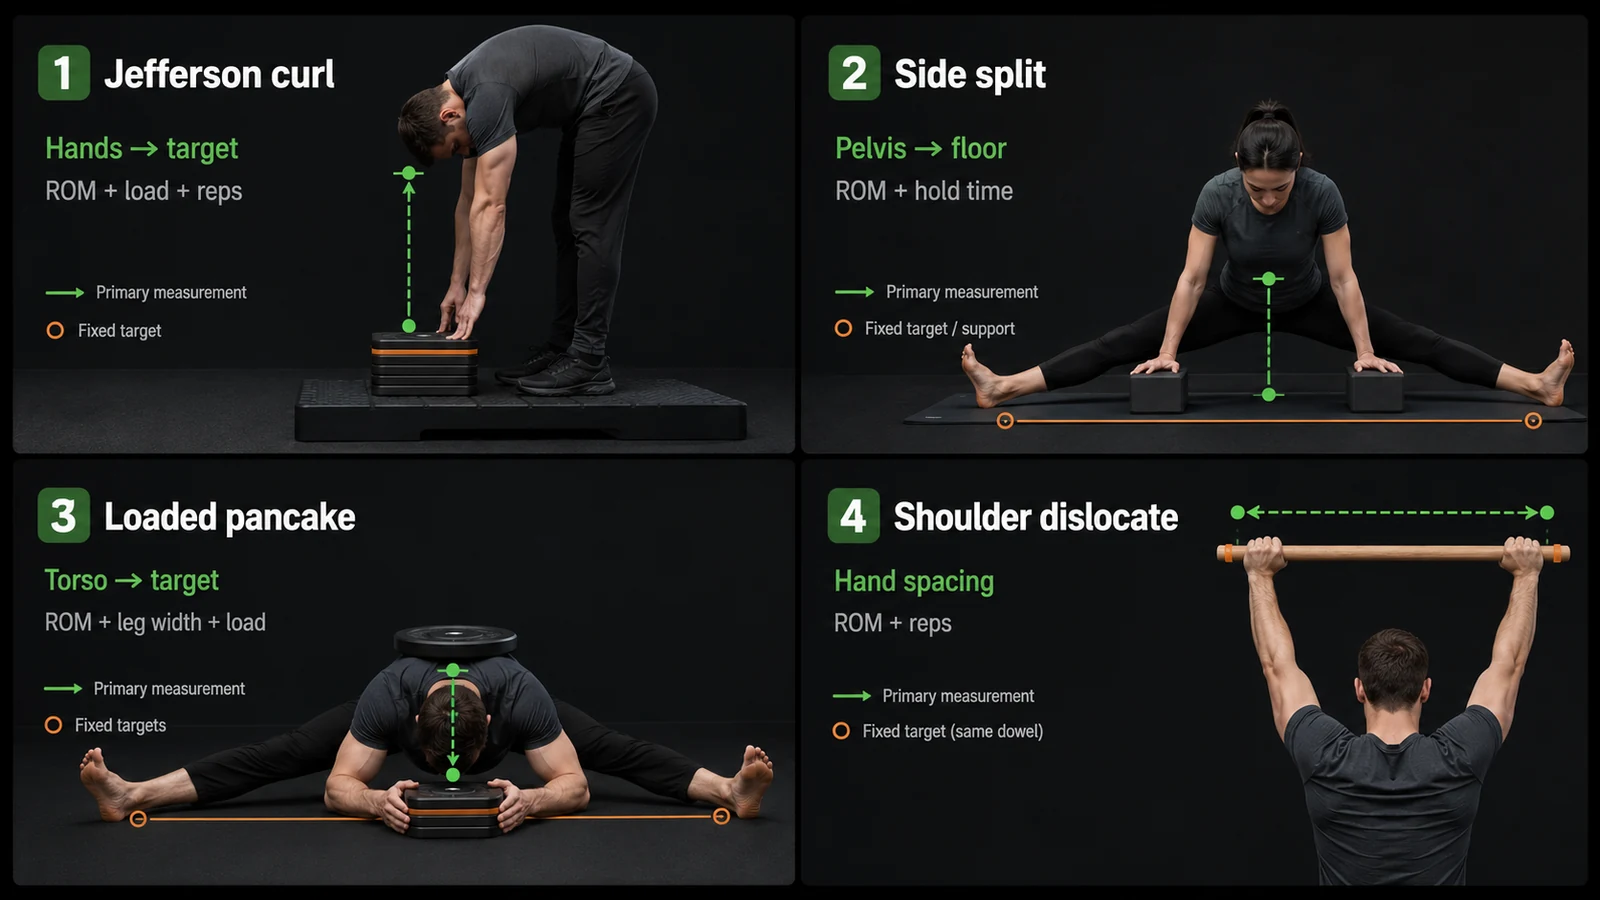
The same measurement principle can be adapted to different exercises. The diagram shows example reference points; use the exercise variation and loading method appropriate to your program.
Log the work that produced the range
A ROM value tells you the result of a movement. The training variables explain what you performed to produce it.
Record only the variables that affect your interpretation:
- sets and repetitions;
- load;
- hold time or tempo;
- ROM for each set or repetition, when practical;
- RPE or a short effort note;
- side, support, or setup changes.
You do not need a laboratory. A notebook or spreadsheet can hold a useful record:
| Date | Exercise and setup | Load | Work | Average ROM | Deepest recorded ROM | Notes |
|---|---|---|---|---|---|---|
| Example session A | Jefferson curl, fixed platform | 12 kg | 3 × 8 | 5.0 cm to target | 4.0 cm | Same warm-up; all reps controlled |
| Example session B | Side split, fixed stance | Bodyweight | 3 × 30 s | 18 cm from floor | 17 cm | Right side felt less stable |
These rows illustrate the format. They are not prescriptions or records from the supplied charts.
Average, maximum, and minimum ROM answer different questions
The correct summary depends on how you defined the metric.
If lower distance means more range, the minimum value represents the deepest recorded position. If higher reach or distance means more range, the maximum value does. A label such as deepest recorded ROM avoids confusion across different conventions.
The average shows what you reproduced across the selected sets or repetitions. The deepest value shows the farthest position reached during the planned work. A target success count shows how many attempts met the standard.
Suppose one repetition reaches 3 cm from the target, while the rest remain near 7 cm. The personal best may be interesting, but the average shows that 3 cm is not yet your repeatable working range. When the whole set moves toward 3 cm under the same conditions, the evidence becomes stronger.
Separate long-term progress from daily variation
Your ROM will not improve in a straight line. Warm-up, repeated trials, time of day for some tests, test order, and changes in setup or measurement technique can change a reading. A single poor session does not prove that your mobility has declined.
Read the data at three levels:
- The set: Did you meet the target with the planned technique, load, and effort?
- The session: What were the average and deepest recorded values across the planned work?
- The training block: Are several comparable sessions shifting in the same direction?
Compare like with like. A loaded Jefferson curl after a full warm-up should not share a trend line with an unloaded morning forward fold. A supported side split should not replace an unsupported measurement halfway through the block without marking the change.
Small changes may fall within measurement error
A one-centimetre difference is measurable. It is not automatically physical progress.
Every test contains some measurement error. Researchers often report a minimal detectable change, which estimates how large a difference must be before they can distinguish it from the expected error of that protocol.
A systematic review of the weight-bearing lunge test for ankle dorsiflexion reported average minimal detectable changes of approximately 1.6 cm between clinicians and 1.9 cm within clinician measurements.[6] Those numbers apply to that ankle test. They do not create a universal two-centimetre rule for splits, forward folds, or shoulders.
When your home test has no published error estimate, use a practical standard: treat a tiny personal best as one data point. Look for repeated movement in the average and deepest values across comparable sessions before changing your plan.
Use a graph to ask better questions
Plotting the session average and deepest recorded ROM can reveal whether your working range is shifting, flattening, or becoming more variable. Include only comparable sessions on the same line, and mark any deliberate change in exercise variation, target setup, load, or measurement convention.
The graph cannot tell you why a change occurred. Check the log for differences in exercise selection, load, compliance, setup, or training context. If the protocol remained stable and the trend stays flat, change one programming variable when practical and collect another block of data.
For a broader review process, use the weekly and block-end training-data checklist.
Use photos as supporting evidence
Photos still have value. They can show technique, joint positions that your distance metric misses, or a visible milestone worth documenting.
Treat them as a second layer of evidence. Use the same camera height, angle, distance, lens, lighting, warm-up state, and movement standard. A casual photograph does not provide a precise joint-angle measurement merely because two images look different.
Research on photo-based ROM measurement uses defined applications, visible landmarks, and repeatable protocols. Even under those conditions, measurement error can remain substantial and depends on the movement and population studied.[7] Your progress photo can enrich the record. It should not carry the entire conclusion.
Know when a mobility log is not enough
A home ROM record measures performance in a chosen exercise. It cannot diagnose why a joint feels restricted, determine whether pain comes from a specific tissue, or decide whether a position is appropriate after an injury.
Stop self-testing and seek appropriate clinical guidance after major trauma or recent surgery, or when a movement produces severe or escalating pain, marked weakness, numbness, rapidly increasing swelling, or a sudden major loss of function. Follow any restrictions already given by a clinician. Your training history may provide useful context, but it does not provide the diagnosis.
Track mobility progress in Workout Lab
You can apply this system in a notebook or spreadsheet. The important habit is defining the exercise and recording comparable work.
Workout Lab reduces the administrative work when mobility training sits beside strength, calisthenics, conditioning, or skill practice. For each exercise, you can choose supported metrics such as ROM, load, repetitions, time, distance, and RPE. ROM uses centimetres and can include positive or negative values, so you can preserve the direction convention of your chosen test.
A practical setup might look like this:
- Jefferson curl: ROM + load + repetitions + RPE
- Side-split hold: ROM + time
- Loaded pancake: ROM + load + time or repetitions
- Shoulder dislocate: ROM for hand spacing + repetitions
Search the shared library first. If the exact variation is missing, create a clearly named custom exercise and keep its protocol stable. Custom exercises are public and cannot later be modified, so choose the name and metrics carefully. Use exercise notes to preserve platform height, target reference, stance, support, or other conditions. The custom-exercise guide explains the broader setup logic. Workout history keeps logged sets and notes together, and Workout Lab documents exercise analysis over selectable time ranges.[8]
Creating new custom exercises and accessing analytics require Pro after the 30-day trial. The measurement method itself does not depend on the app. A spreadsheet remains enough if you define the test well and keep recording it. If you want ROM, load, repetitions, time, and notes in one training history, set up your first Workout Lab exercise.
Start with one movement
Do not build a complete mobility assessment battery this weekend. Choose one movement that matters to your training and write its seven-field measurement card.
During your next three comparable sessions:
- perform the same exercise variation and warm-up;
- record the range achieved during the planned working sets;
- log load, repetitions, or time beside it;
- calculate the session average and deepest recorded ROM;
- review the three sessions before changing the protocol.
You will know more than a photograph could show. You will see the work you completed, the range you reproduced, the normal variation between sessions, and whether the trend deserves more time or a programming adjustment.
Reliable mobility data comes from a movement you can repeat, a target you can quantify, and enough comparable working sets to separate a real pattern from a good day.
Research sources
Scientific research
-
Gleim GW, McHugh MP (1997). Flexibility and its effects on sports injury and performance. Sports Medicine, 24(5), 289–299.
- Used here for: distinctions among flexibility measurement methods, not injury claims.
-
Zwerus EL et al. (2019). Normative values and affecting factors for the elbow range of motion. Shoulder & Elbow, 11(3), 215–224.
- Used here for: the difference between active and passive elbow ROM under a defined protocol.
-
Holzgreve F et al. (2020). The acute effect in performing common range of motion tests in healthy young adults. Scientific Reports, 10, 21722.
- Used here for: the effects of repeated trials and previous warm-up on ROM measurements.
-
Manire JT et al. (2010). Diurnal variation of hamstring and lumbar flexibility. Journal of Strength and Conditioning Research, 24(6), 1464–1471.
- Used here for: time-of-day variation in specific hamstring and lumbar field tests.
-
Perret C et al. (2001). Validity, reliability, and responsiveness of the fingertip-to-floor test. Archives of Physical Medicine and Rehabilitation, 82(11), 1566–1570.
- Used here for: repeatability of a defined distance-to-floor protocol in adults with chronic low back pain. It does not validate the test as an isolated measure of hamstring length.
-
Powden CJ, Hoch JM, Hoch MC (2015). Reliability and minimal detectable change of the weight-bearing lunge test: A systematic review. Manual Therapy, 20(4), 524–532.
- Used here for: a test-specific example of measurement error and minimal detectable change.
-
Johansen M et al. (2020). Photo-Based Range-of-Motion Measurement: Reliability and Concurrent Validity in Children With Cerebral Palsy. Pediatric Physical Therapy, 32(2), 135–141.
- Used here for: showing that photo-based ROM measurement requires defined landmarks and protocols. It does not validate informal progress photography in healthy adults.
Product documentation
- Workout Lab Features Overview, Data Analysis & Insights guide, and owner-confirmed product truth sheet. Product capabilities and subscription conditions were rechecked against these sources on 2026-07-28.
Start Tracking Your Progress
Turn your training data into actionable insights with Workout Lab.
Get Started FreeRelated Articles
How to Track Strongman Events and Progress
Learn what to record for carries, stones, presses, pulls, throws, and medleys so you can compare your strongman training over time.
How to Track HYROX Training: Runs, Stations, and RPE
Learn how to log HYROX runs, stations, mixed sessions, and preparation exercises without turning your training into a spreadsheet project.
Your Workout Week in Data: How Automated Weekly Reports Surface What's Actually Happening
A weekly workout report surfaces volume trends, RPE patterns, and Est. 1RM trajectory automatically. Here's what to track and how to act on it.